02 August 2011
Full Blown Pinterest Addiction
Lately I've been obsessed with the website Pinterest. It's amazing! It let's you "pin" pictures (with links) of crafts, recipes, clothes, anything! It's like a virtual inspiration board. I love it! The best part is you can follow other people's boards and see what your friends are pinning. It's a crafting dream. Check out some of my inspiration.
01 August 2011
DIY Fever: Part 3
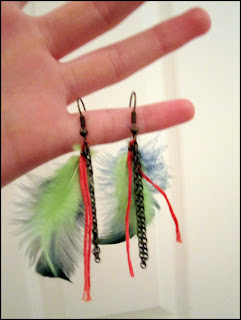
I'm still making things like crazy. I'm not sure what it is about making things with my own two hands, but I love it. Cooking, jewelry, sewing, crafting, painting, anything really. I've also formed a new addiction to pinterest. It's wonderful!
Anyways...here's some more of my creations:


Anyways...here's some more of my creations:

I found a great tutorial a while back on how to make these flowers.


I'm in love with the way these glitter flats turned out. I used two pairs of flats that I don't wear anymore. The blog We Are Not Martha has a great tutorial for these. They're actually really easy to make.


I found a tutorial for this repurposed/knock-off J. Crew sweater on Momma Go Round.
31 July 2011
DIY Fever: Part 2
My last post featured my native American inspired jewelry. I also got the J. Crew and Anthro bug when I was making jewelry. I decided to make some pieces in the style.


I also have a coral colored necklace like this. I made the coral one months ago when I saw something similar to it at J. Crew.

I found a tutorial for this one on Flamingo Toes.


Flamingo Toes also has a tutorial for this necklace, but I altered mine slightly.
28 July 2011
DIY Fever: Part 1
I've had a lot of free time lately. By a lot I mean ENDLESS! For the first seven weeks of the summer, I was a camp counselor at an all girls overnight camp. I left camp three weeks early to prepare for Italy. I'm going to be an exchange student in Florence this semester. I've been spending about half of my time getting documents, travel essentials, and other miscellaneous things in order for Italia. The other half of my time I've been crafting! Well, not your typical crafting, more like diy knock-offs of Anthropologie, J. Crew, Free People...basically all of the stores that I wish I could afford on a regular basis.


When I first got home from camp, I was really inspired by native American art and traditions. Of course I put my own spin on it. Check it out:

(This necklace hits at about the navel level)


26 July 2011
Better Than Crack Brownies
I'm still trying to get rid of marshmallows, so I adapted a recipe from How Sweet It Is.

I used the Hershey's brownie recipe as my base again, but I doubled the recipe this time to fit with the recipe on How Sweet It Is. I also substituted the reese's cups and peanuts for marshmallows and chopped hazelnuts. The end result is delicious, but VERY VERY rich! It might take my family and I awhile to finish these.

I used the Hershey's brownie recipe as my base again, but I doubled the recipe this time to fit with the recipe on How Sweet It Is. I also substituted the reese's cups and peanuts for marshmallows and chopped hazelnuts. The end result is delicious, but VERY VERY rich! It might take my family and I awhile to finish these.
25 July 2011
Another Awesome Giveawy
Oh the lovely things is hosting another great giveaway! Go check it out!
Also, look out for another brownie recipe! I just tried a new recipe, and I'm waiting to see how it turns out.
Also, look out for another brownie recipe! I just tried a new recipe, and I'm waiting to see how it turns out.
23 July 2011
Rocky Road Brownies
I have a killer addiction to chocolate, and I LOVE to bake. Brownies are my go to when I get a spur of the moment baking bug. They're so easy to make, and hardly impossible to mess up. Brownies are also pretty versatile. You can throw in basically whatever you have lying around in your kitchen (within reason).
Last night I got the urge to bake after dinner. I had an open bag of marshmallows from another recipe that I needed to use before they got hard. I decided to make rocky road brownies. I adapted the basic brownie recipe from Hersheys.com for my brownie adventure.

Ingredients:
Last night I got the urge to bake after dinner. I had an open bag of marshmallows from another recipe that I needed to use before they got hard. I decided to make rocky road brownies. I adapted the basic brownie recipe from Hersheys.com for my brownie adventure.

Ingredients:
- 1/2 cup (1 stick) butter or margarine, melted
- 1 cup sugar
- 1 teaspoon vanilla extract
- 2 eggs
- 1/2 cup all-purpose flour
- 1/3 cup cocoa
- 1/4 teaspoon baking powder
- 1/4 teaspoon salt
- handful of chopped walnuts
- handful of chopped pecans
- handful of chopped Hershey's dark chocolate squares (or semi-sweet morsels)
- about 1/4 cup chocolate syrup
- about 1 1/2 cup marshmallows
Stir together butter, sugar, and vanilla extract in a large bowl. I used my electric mixer for the entire mixing process, but it's not crucial to use an electric mixer. Add eggs. Slowly mix in flour, cocoa, baking powder, and salt.
This is where I started adding at will. Please forgive me for the vague measurements. I literally threw in handfuls of nuts and just eyeballed about how much was enough. Again, it's nearly impossible to mess up brownies, so don't fret over the vague measurements. Mix in walnuts, pecans, and chocolate chunks. Drizzle chocolate syrup in and mix. The chocolate syrup makes the brownies fudgier, so use you're own discretion here. I like my brownies really fudgy, but if you want cake like brownies then hold back or exclude it all together. This chocolate syrup trick works with all brownies, even mixes, if you want to make your brownies really gooey. Hot fudge ice cream topping works too.
Spread batter into greased pan, and bake for 20 minutes. Remove brownies from oven, and sprinkle marshmallows on top of partially baked brownies. Warning: the marshmallows make the finished product very gooey and messy (but also delicious)! Add as many marshmallows as you like. I covered mine because I needed to use up my bag of marshmallows. Return the pan to oven for another 2-3 minutes or until marshmallows are slightly golden. Remove from oven, let cool, and ENJOY!!
Subscribe to:
Posts (Atom)